
In the part 2 of Teams Approval using Power Automate, we will learn to how to implement approval
in Teams using Adaptive Cards. The part 1 of this series is here.
So, let’s start with little introduction of Adaptive Cards
Adaptive Cards
Introduction
Adaptive Cards are platform independent snippets of UI, written in JSON, that applications can openly exchange. When delivered to a specific app, the JSON is transformed into native UI that automatically adapts to its look and feel. It helps design and integrate light-weight UI for all major platforms and frameworks.
E.g. if you are using expense report adaptive card in Teams, Outlook and Bot Framework, then same adaptive card can be used across all the three apps and it will adapt the native UI of the parent application where it is being displayed.
How to use
Card Authors defines their card using the card designer (https://adaptivecards.io/designer/). As card author designs the card, JSON schema for the card is automatically created by the designer. Then card author takes the json schema of the card and uses it in application. Designer provides drag and drop experience to the author to design the card, so author does not require any understand of JSON schema.
Power Automate actions to use in Teams for approval using
Adaptive Cards
-
-
- Post an Adaptive Card to Teams User and wait for response
If you want to get approval from specific user, then use this action
2. Post an Adaptive Card to Teams Channel and wait for response
If you want to get approval from members of specific channel, then use this action
- Post an Adaptive Card to Teams User and wait for response
-
Now we will learn to create a sample flow that implements the Teams Approval using Power Automate with Adaptive Cards
Walkthrough to build the flow
List structure
First you will need a SharePoint list to store the request data which will be processed by Flow. Below is the SharePoint List structure which I am using in the walkthrough:
- List Name: Teams Requests
- List Columns:
- Title – Single line of text
- Description – Multiple line of text
- Private Team? – Yes/No
- Owners – People and Group (allow multiple)
- Members – People and Group (allow multiple)
Build the adaptive card for approval
Below is the example adaptive card that I have used for this sample. If you want to use similar sample then copy the json code given below, or design your own adaptive card using the adaptive card designer
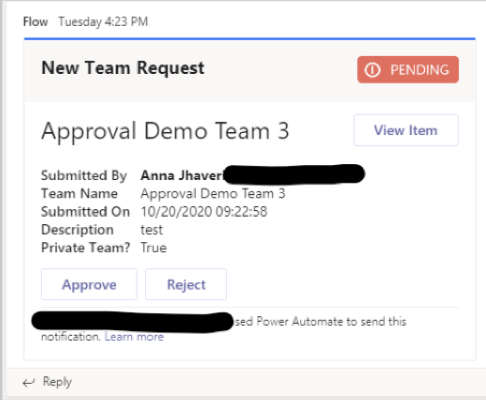
Sample Adaptive Card JSON below. Please note that I am using Power Automate dynamic content in this JSON to get the details of the item like Title, Description, Created, Private team column data populated in the adaptive card. So if you want to use the same JSON as is, then you need to match the column names as per the list structure I provided above, or change the dynamic content references once you paste this json in the Power Automate action.
{
	"type": "AdaptiveCard",
	"body": [ {
		"type": "Container",
		"style": "emphasis",
		"items": [ {
			"type": "ColumnSet",
			"columns": [ {
				"type": "Column",
				"items": [ {
					"type": "TextBlock", "size": "Large", "weight": "Bolder", "text": "**New Team Request**"
				}
				],
				"width": "stretch"
			}
			,
			{
				"type": "Column",
				"items": [ {
					"type": "Image", "url": "https://adaptivecards.io/content/pending.png", "altText": "Pending", "height": "30px"
				}
				],
				"width": "auto"
			}
			]
		}
		],
		"bleed": true
	}
	,
	{
		"type": "Container",
		"items": [ {
			"type": "ColumnSet",
			"columns": [ {
				"type": "Column",
				"items": [ {
					"type": "TextBlock",
					"size": "ExtraLarge",
					"text": "@{triggerOutputs()?['body/Title']}",
					"wrap": true
				}
				],
				"width": "stretch"
			}
			,
			{
				"type": "Column",
				"items": [ {
					"type": "ActionSet",
					"actions": [ {
						"type": "Action.OpenUrl",
						"title": "View Item",
						"url": "@{triggerOutputs()?['body/{Link}']}"
					}
					]
				}
				],
				"width": "auto"
			}
			]
		}
		,
		{
			"type": "FactSet",
			"spacing": "Large",
			"facts": [ {
				"title": "Submitted By",
				"value": "**@{triggerOutputs()?['body/Author/DisplayName']}** @{triggerOutputs()?['body/Author/Email']}"
			}
			,
			{
				"title": "Team Name",
				"value": "@{triggerOutputs()?['body/Title']}"
			}
			,
			{
				"title": "Submitted On",
				"value": "@{triggerOutputs()?['body/Created']}"
			}
			,
			{
				"title": "Description",
				"value": "@{triggerOutputs()?['body/Description']}"
			}
			,
			{
				"title": "Private Team?",
				"value": "@{triggerOutputs()?['body/PrivateTeam_x003f_']}"
			}
			]
		}
		]
	}
	,
	{
		"type": "Container",
		"items": [ {
			"type": "ActionSet",
			"actions": [ {
				"type": "Action.Submit",
				"title": "Approve",
				"style": "positive",
				"data": {
					"id": "_qkQW8dJlUeLVi7ZMEzYVw", "action": "approve"
				}
			}
			,
			{
				"type": "Action.ShowCard",
				"title": "Reject",
				"style": "destructive",
				"card": {
					"type": "AdaptiveCard",
					"body": [ {
						"type": "Input.Text", "id": "RejectCommentID", "placeholder": "Please specify an appropriate reason for rejection.", "isMultiline": true
					}
					],
					"actions": [ {
						"type": "Action.Submit",
						"title": "Send",
						"data": {
							"id": "_qkQW8dJlUeLVi7ZMEzYVw", "action": "reject"
						}
					}
					],
					"$schema": "http://adaptivecards.io/schemas/adaptive-card.json"
				}
			}
			]
		}
		]
	}
	],
	"$schema": "http://adaptivecards.io/schemas/adaptive-card.json",
	"version": "1.2",
	"fallbackText": "This card requires Adaptive Cards v1.2 support to be rendered properly."
}
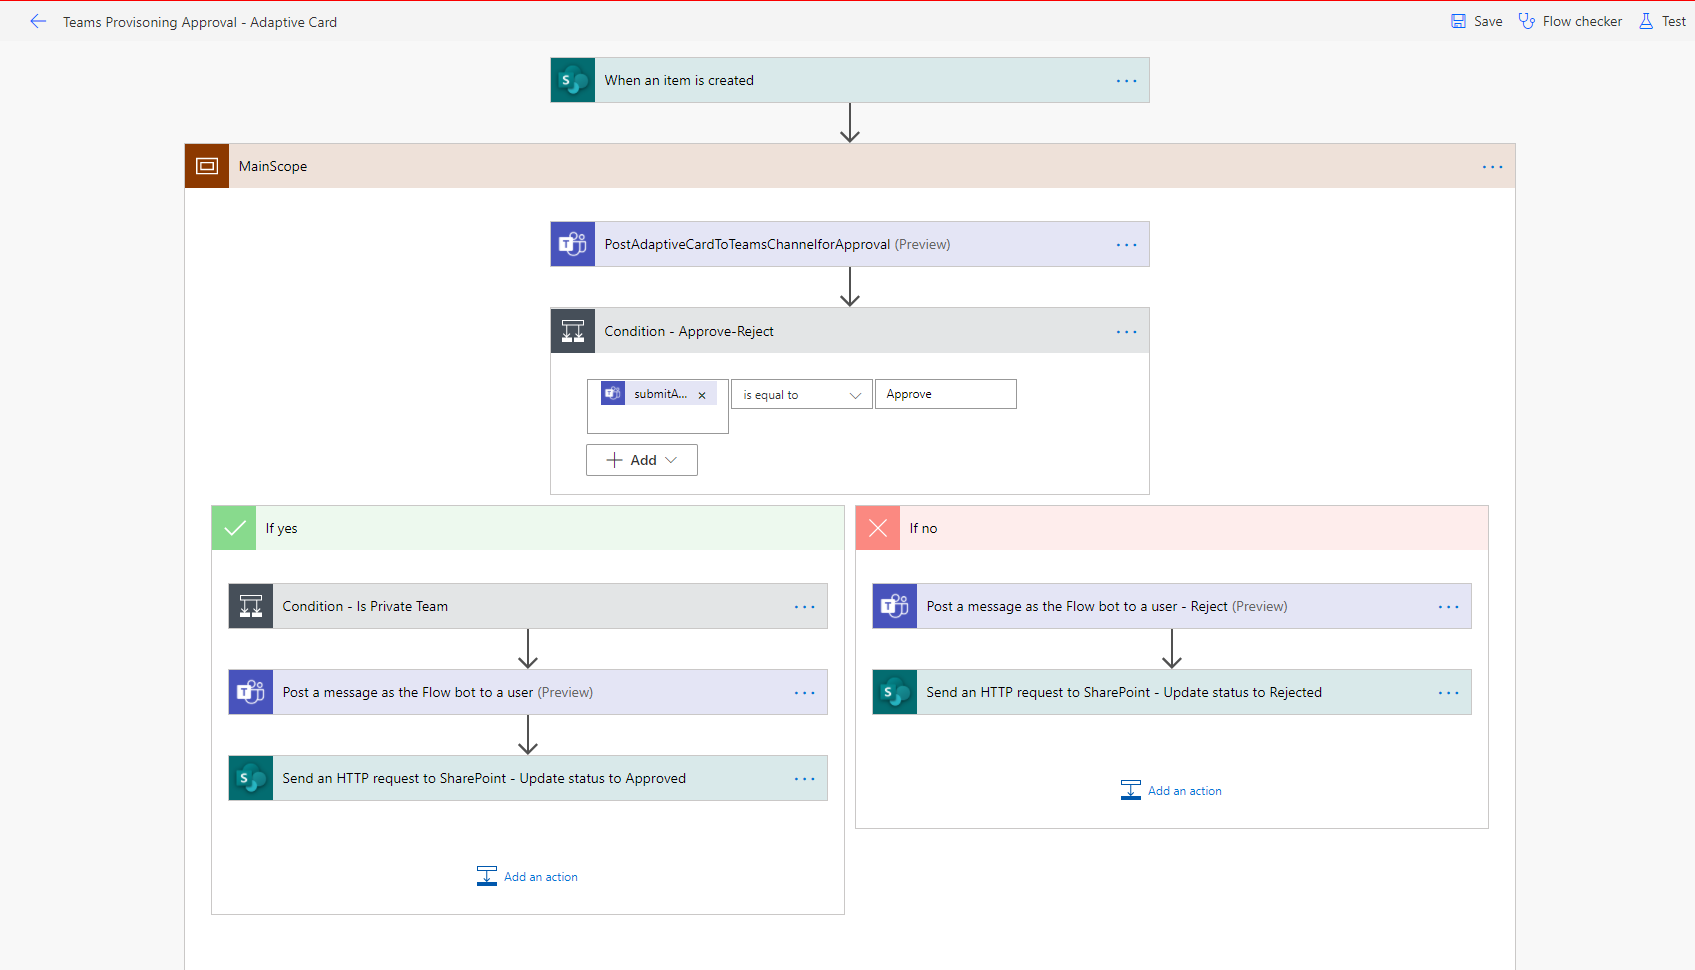
Create the Flow
- To create the Flow, Go to Power Automate -> Create -> Start from Blank -> Automated Flow
- Give an appropriate name for the Flow and select the “When an item is created” trigger and click on Create button
- Add “Post an Adaptive Card to Teams Channel and wait for response” action
- Rename the action to this name “PostAdaptiveCardToTeamsChannelforApproval”

Note this is important step as this action name will be used in other actions.
-
- Team: Select the Team in which you want to post the approval
- Channel: Select the Channel in which you want to post the approval
- Message: Copy the json given above and paste it in the message section and ensure the dynamic content is copied properly, or if you have built your own adaptive card then paste your json here and add any dynamic content as required.
- Update Message: Provide the update message, which will be shown after approver user has provided the decision using the card
- Should update card: Select yes here.
Note: It is important to set “Yes” for Should update card, so that card gets updated to show the update message after approver user clicks on approve/reject buttons in adaptive card, otherwise the card will still keep showing the approve/reject buttons and other users won’t know that approver user has already provided his/her decision on the card.
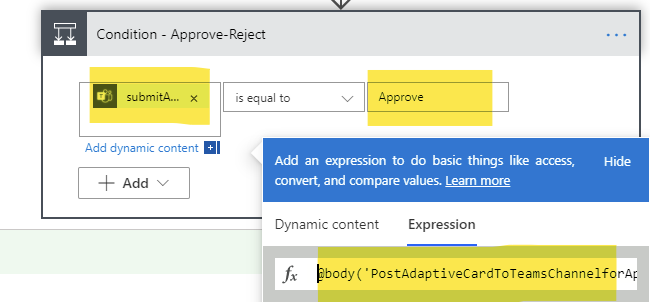
- Add “Condition” action to check whether approver has approved or rejected the request, on left hand side of the condition copy
“body(‘PostAdaptiveCardToTeamsChannelforApproval’)[‘submitActionId’]” expression (without quotes) and on right hand side provide “Approve” value or whatever your action value is defined in your adaptive card for the buttons.
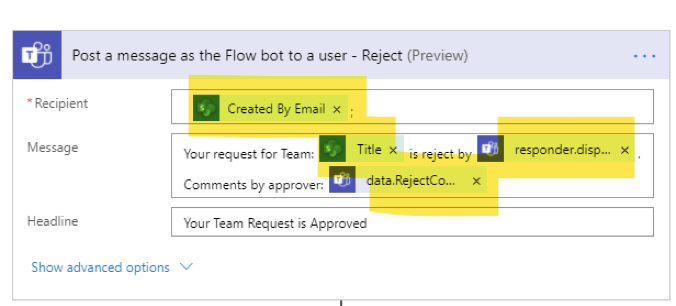
- Under the “No” branch to send message to the requestor that approval is rejected, do following:
- Add “Post a message as the Flow bot to a user” action
- Recipient: From dynamic content select “Created by Email” under “When an item is created”
-
- Message: Provide appropriate message. If you have used the json I provided for adaptive card, or if you have used your own adaptive card and it has comments for Rejection, you can include comments provided by approver while providing the approval decision and the approver name from the adaptive card
- To get the approver name use this expression without quotes: “body(‘PostAdaptiveCardToTeamsChannelforApproval’)[‘responder’]?[‘displayName’]”
- To get the comments use this expression without quotes: “body(‘PostAdaptiveCardToTeamsChannelforApproval’)[‘data’]?[‘RejectCommentID’]”
- Headline: Provide appropriate headline of the message
- Note: Here instead of sending message on team, you can also send an email to the requestor.
- Message: Provide appropriate message. If you have used the json I provided for adaptive card, or if you have used your own adaptive card and it has comments for Rejection, you can include comments provided by approver while providing the approval decision and the approver name from the adaptive card
- Under the “Yes” branch of condition we will create new team:
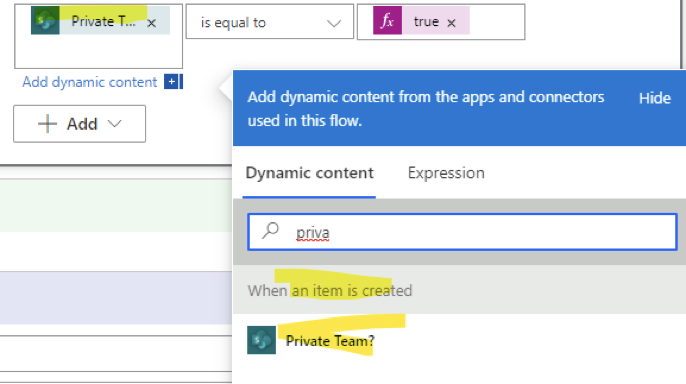
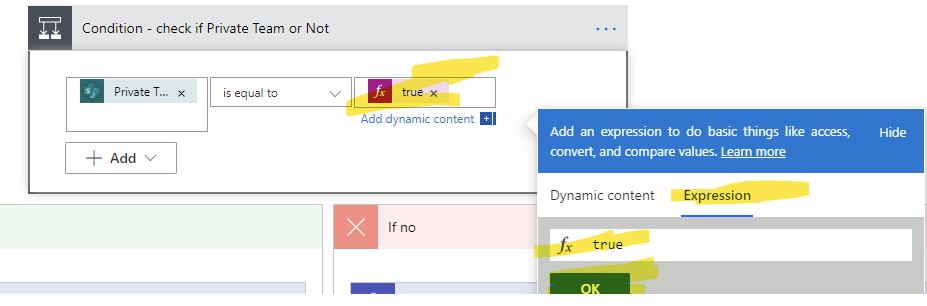
- Add “Condition” action to check whether the item has Private Team request or not
- In the Condition dynamic content, select “Private Team?” under “When an item is created”, select “equal to” from the dropdown, for the value: in the expression box, type “true” and click on Ok button.
-
- Under the “Yes” branch, add “Create a team” action
- Team Name: From Dynamic Content select “Title” under “when and item is created”
- Description: From Dynamic Content select “Description” under “when and item is created”
- Visibility: Select “Private”
- Under the “Yes” branch, add “Create a team” action

-
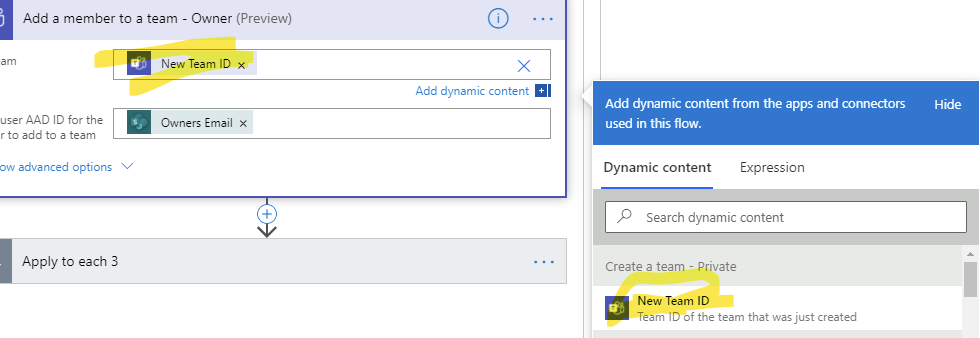
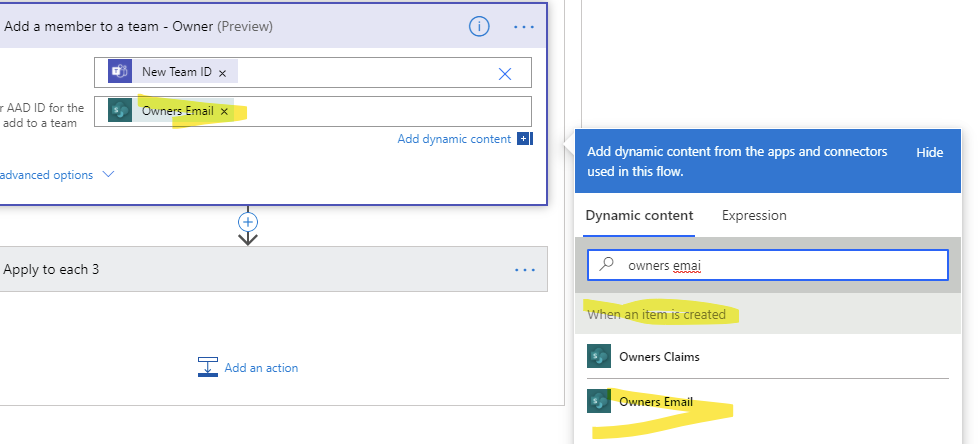
- Under the “Yes” branch Add “Add a member to a team” action
- Team: select from dynamic content: New Team ID
- Under the “Yes” branch Add “Add a member to a team” action
-
-
- User: Select “Owners Email” under “When an item is created”
-
-
-
- Should the newly added user be an owner of the team: Select Yes
- Note: This will automatically add Apply to Each action under which the “Add a member to a team” action will be added, as the Owners is of multi-valued field type
- Again add “Add a member to a team” action
- Team: select from dynamic content: New Team ID
- User: Select “Members Email” under “When an item is created”
- Should the newly added user be an owner of the team: Select No
- Note: This will automatically add Apply to Each action under which the “Add a member to a team” action will be added, as the Members is of multi-valued field type
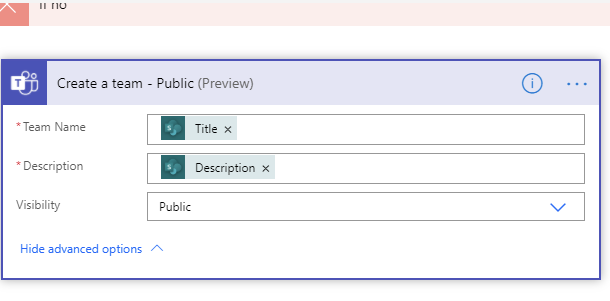
- Under the “No” branch:
- Add “Create a team” action
- Team Name: From Dynamic Content select “Title” under “when and item is created”
- Description: From Dynamic Content select “Description” under “when and item is created”
- Visibility: Select “Public”
-
-
-
- Outside of condition which checks for private team add “Post a message as the Flow bot to a user” action
- Recipient: From dynamic content select “Created by Email” under “When an item is created”
- Message: Provide appropriate message
- Headline: Provide appropriate headline of the message
- Note: Here instead of sending message on team, you can also send an email to the requestor.
- Outside of condition which checks for private team add “Post a message as the Flow bot to a user” action
-