
If you want to make any changes in SharePoint from Power Automate, the REST API is one of the best options to use. Sharepoint has its own REST APIs that can be used to create site/items/files/folders, update site/items/files/folders, or make any changes in the site or any update within SharePoint for which a REST endpoint is available. You can use the "Send HTTP Request to SharePoint" action to send REST API calls to perform any operation in SharePoint.
So First we will go through some basic operations as follows:
- Create List Item
- Update List Item
Create List Item
There is already a built-in action in Power Automate called “Create Item” to create a new list item in the SharePoint list, but creating a new List Item using REST API call from Power Automate gives you more control and flexibility. For example, if you want to update the hyperlink column to have name “Microsoft” with link www.microsoft.com, you cannot do it using Create Item. Instead, you need to use REST API. Create Item will update both the name and URL with the link you provided in the hyperlink column.
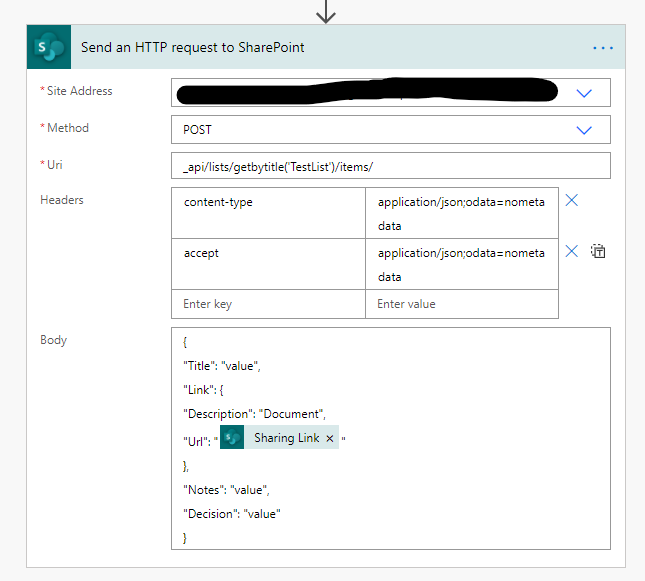
Go ahead and add the “Send HTTP Request to SharePoint” action to your flow and configure your action as shown below.
Let us understand the parameters of this action:
- Site Address: Provide the Site URL where your list resides.
- Method: POST (as we want to make changes in SharePoint)
- URI: api/lists/getbytitle(‘Documents’)/items/ (here in place of documents, put your List Title)
- Headers:
- content-type: application/json;odata=nometadata
- accept: application/json;odata= nometadata
- Body:
- Here is the main part of this action: the values you need to set for the columns to create the list will go here. In my example, I set up four column values: Title, Link, Notes, and Decision.
- Title: This is a single line-of-text column, so it will be a simple text value
- Link: This is a Hyperlink type of column, so you need to provide the value in the following format:
"Link": {
            "Description": "<Title of the link>",

            "Url": "<actual link>"

}
- Notes: This is a multiline text column so it will be a simple text value
- Decision: This is a choice column, so this will also be a simple text value from the choice options that you have configured for the column.
- The format of value you provide here changes depending on the type of the column. For example, it will be different for the lookup column, Taxonomy, date, and so on.
- One more important point to note is that the column names you provide here will be internal names of columns. How do you find the internal name of the column? Go to your List Settings, then click on the specific column. Then look at the browser URL and take the name that appears after the Field=
Full Body Parameter value

{

            "Title": "value",

            "Link": {

            "Description": "Microsoft",

            "Url": "http://www.microsoft.com"

            },

            "Notes": "value",

            "Decision": "value"

}
Update List Item
There is already a built-in action in Power Automate called “Update Item” to update existing list item in SharePoint list, but updating List Item using REST API call from Power Automate gives you more control and flexibility. For example, an Update Item action requires you to update all the mandatory columns even if you don’t want to update those columns. Using REST API you are required to update only those columns that you need to update. So, add “Send HTTP Request to SharePoint” action to your flow and configure your action as shown below.
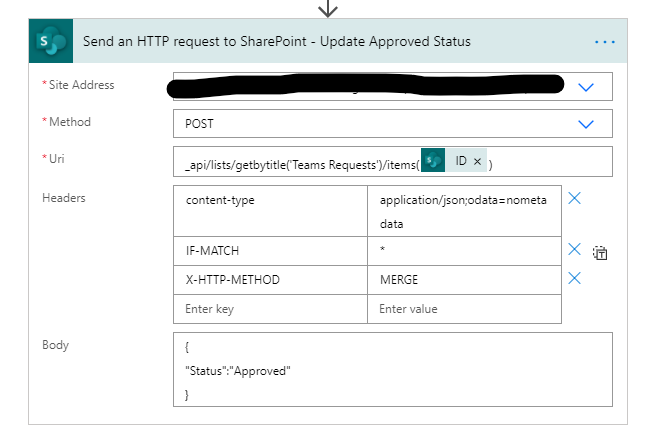
- Site address: Provide the Site URL where your list resides.
- Method: POST (as we want to make changes in SharePoint)
- URI: api/lists/getbytitle(‘Teams Requests’)/items(ItemID) (here in place of Teams Requests, put your List Title, and in place of ItemID, put ID of your item)
- Headers:
- content-type: application/json;odata=nometadata
- IF-MATCH: *
- X-HTTP-METHOD: MERGE
- Body:
- Here is the main part of the action. The values you need to set for the columns to create the list will go here. So, in my example I set one column value: Status.
- Status: is a choice column in my list and I can simply provide a text value to update the choice column value.
- The format of value that you provide here changes depending on the type of column. For example, it will be different for lookup column, Taxonomy, date, and so on.
- Here again one more important point to note is that the column names you provide here will be internal name of columns. How do you find the internal name of the column? Go to your List Settings, then click on the specific column.
body parameter.
Full Body Parameter value

{

            "Status":"Approved"

}
That’s it for now folks. Thanks for reading the blog. There are many other REST APIs that I need to document, which I will post on the blog in coming weeks.