
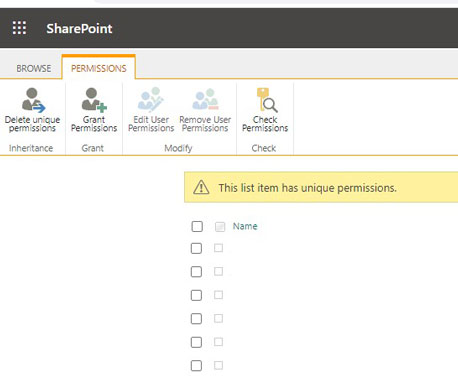
While developing a flow for SharePoint list process, I came across a requirement to set unique permissions for SharePoint list items. So, in this blog post I will share a walk-through on how to set unique permissions for items in SharePoint using Power Automate.
Walk-through
In your flow add the actions as per below instructions:
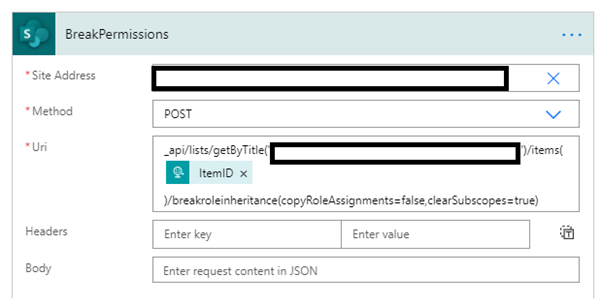
Break permissions on item
This step is to break permissions on an item if there are permissions for the item.
1. Add “Send HTTP Request to SharePoint” action
2. Change the name of action to “BreakPermissions”. Note naming the actions is important so name your actions appropriately as it will be used in later steps.
3. Configure properties of action:
a. Site Address: Provide your SharePoint site URL
b. Method: POST
c. Uri: _api/lists/getByTitle(”)/items(@{triggerBody()?
[”]})/breakroleinheritance(copyRoleAssignments=false,clearSubscopes=true)
Note: Replace with your list title and with the ID of the item on which you want to break permission
Here we are setting “copyRoleAssignments” to false because we don’t want to copy any previous permissions on the list item which are inherited from its parent, we will assign permissions to specific groups/users in subsequent steps.
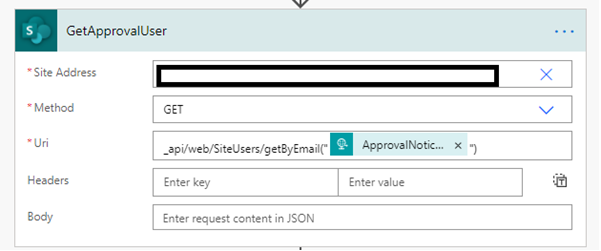
Get User/Group
To assign permissions to user or group, you need user id or group id to which you want to assign specific permissions on item. Even if it’s an Azure security group or O365 group, that group is added as user to SharePoint, so you need to get its SharePoint User ID using this step
1. Add “Send HTTP Request to SharePoint” action
2. Change the name of action to “GetApprovalUser” or something more appropriate. Note naming the actions is important so name your actions appropriately as it will be used in later steps.
3. Configure properties of action:
a. Site Address: Provide your SharePoint site URL
b. Method: GET
c. Uri:
(for user or AD Group) _api/web/SiteUsers/getByEmail(“”)
Note: Replace with valid user email address like abc@domain.com. Also, you can use this URI to get id of user or Azure AD security group or O365, if you want to get ID of SharePoint group then you need to use below URI:
(for SharePoint Group) _api/web/sitegroups/getbyname(”)?$select=id
Note: Replace with the valid SharePoint Group Name
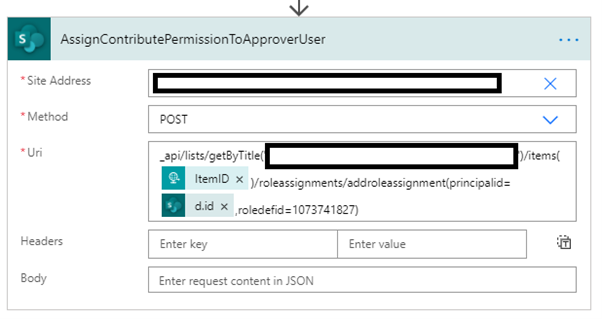
Assign permissions
Now you have broken the permissions on the item, you also have the user id/group id to which you want to assign permissions, so let’s go through steps on how to assign permissions to user/group to item.
1. Add “Send HTTP Request to SharePoint” action
2. Change the name of action to appropriate name
3. Configure properties of action:
a. Site Address: Provide your SharePoint site URL
b. Method: POST
c. Uri: _api/lists/getByTitle()/items()/roleassignments/addroleassignment(principalid=@{body(GetApprovalUser)[‘d’][‘id’]},roledefid=1073741827)
Notes:
I. Replace with title of your list
II. Replace with id of your list item
III. @{body(GetApprovalUser)[‘d’][‘id’] – this will get the user id from the action that you have added to your Flow, so if you action name is not “GetApprovalUser” then replace it with your action name
IV. Here roledefid defines what permission you want to assign to the user/group, below are the permission numbers, depending on the permission you want to assign, use the number in the roledefid value
a. 1073741829 – full control permissions
b. 1073741826 – read permissions
c. 1073741827 – contribute permissions
That’s all folks and we are done with breaking permissions and assigning unique permissions to user/group on a list item. Please note that Break permissions action step is required once per item and get user and assign permissions actions steps are required based on no of users/groups to whom the permissions need to be assigned on an item.